The Mechanism for the Acid-catalysed Hydrolysis of Esters
This page looks in detail at the mechanism for the hydrolysis of esters in the presence of a dilute acid (such as hydrochloric acid or sulfuric acid) acting as the catalyst. It uses ethyl ethanoate as a typical ester.
The Mechanism for the Hydrolysis of Ethyl ethanoate
A Reminder of the Facts
Ethyl ethanoate is heated under reflux with a dilute acid such as dilute hydrochloric acid or dilute sulfuric acid. The ester reacts with the water present to produce ethanoic acid and ethanol.
Because the reaction is reversible, an equilibrium mixture is produced containing all four of the substances in the equation. In order to get as much hydrolysis as possible, a large excess of water can be used. The dilute acid provides both the acid catalyst and the water.
The Mechanism
Warning! This is a fairly complex mechanism, and is definitley NOT required for any UK A-level (or equivalent) syllabus. I have included it in case it is of use to my many non-UK visitors.
All the steps in the mechanism below are shown as one-way reactions because it makes the mechanism look less confusing. The reverse reaction is actually done sufficiently differently that it affects the way the mechanism is written. You will find a link to the esterification reaction further down the page if you are interested.
Note: The explanation assumes that you know about the use of curly arrows in organic reaction mechanisms. If you aren't happy about these follow this link before you go any further. (To be honest, if you are that unsure about the conventions used in reaction mechanisms, you probably shouldn't be reading this page anyway – you will find it distinctly scary!)
Step 1
The actual catalyst in this case is the hydroxonium ion, H3O+, present in all solutions of acids in water.
In the first step, the ester takes a proton (a hydrogen ion) from the hydroxonium ion. The proton becomes attached to one of the lone pairs on the oxygen which is double-bonded to the carbon.

The transfer of the proton to the oxygen gives it a positive charge, but the charge is actually delocalised (spread around) much more widely than this shows.
One way of representing this delocalisation is to draw a number of structures called resonance structures or canonical forms joined by double-headed arrows. You could, if you wished, put in some curly arrows to show the movements of electrons which change one of these structures into the next.

None of these formulae represents the true structure of the ion – but each gives you some information about it. For example, notice where the positive charge is in the three structures. What this means in reality is that the positive charge is spread around over those three atoms – the two oxygens and the carbon.
Note: If you haven't come across canonical forms as a way of representing delocalisation, don't worry about it particularly. It is important, however, that you don't imagine that the molecule is rapidly flipping from one structure to another. The double-headed arrows mean something different.
A mule is a hybrid of a donkey and a horse. In this notation, you could represent a mule by writing donkey and horse connected by a double-headed arrow. Neitherdonkey nor horse accurately represents what a mule looks like, but with a bit of imagination you could build up a fairly good picture of a mule by combining together the characteristics of both donkey and horse. But a mule obviously doesn't spend its time rapidly changing back and forth between being a donkey and a horse!
The next stage of the mechanism involves an attack on the carbon, and so it is convenient to use the structure showing the positive charge on that carbon in the next step.
Step 2
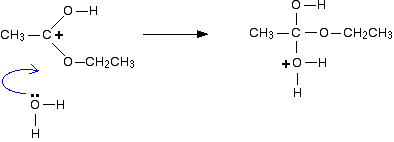
The positive charge on the carbon atom is attacked by one of the lone pairs on the oxygen of a water molecule.

Note: You could work out precisely why that particular oxygen carries the positive charge on the right-hand side. On the other hand, you could realise that there has to be a positive charge somewhere (because you started with one), and that particular oxygen doesn't look right – it has too many bonds. Put the charge on there!
That's a quick rough-and-ready reasoning which works every time I use it!
Step 3
What happens next is that a proton (a hydrogen ion) gets transferred from the bottom oxygen atom to one of the others. It gets picked off by one of the other substances in the mixture (for example, by attaching to a lone pair on a water molecule), and then dumped back onto one of the oxygens more or less at random.
Eventually, by chance, it will join to the oxygen with the ethyl group attached. When that happens, the net effect is:

Step 4
Now a molecule of ethanol is lost from the ion. That's one of the products of the reaction.

The structure for the latest ion is just like the one we discusssed at length back in step 1. The positive charge is actually delocalised all over that end of the ion. The real structure will be a hybrid of these:

It is easier to follow what is happening if we keep going with the structure with the charge on the carbon.
Step 5
The hydrogen is removed from the oxygen by reaction with a water molecule.

And there we are! We have produced the ethanoic acid (the other product of the reaction) and the hydroxonium ion catalyst has been regenerated.
You might also be interested in:
Properties and reactions of alcohols Properties and reactions of carboxylic acids Properties and reactions of estersWhere would you like to go now?
To explore the reverse of this reaction To the catalysis menu To the Physical Chemistry menu To the organic mechanisms menu To Main Menu